Hayward | SP0608U | Jiffy Niche, 0.75"-1", Vinyl/FiberGlass Spa Light
Hayward | SP0608U | Jiffy Niche, 0.75"-1", Vinyl/FiberGlass Spa Light
SKU#: SP0608U
$99.99
- Attractive, injection molded DuralonTM face rim assembly, for corrosion-free performance.
- Fast and simple installation. Minimal tools required.
- Specially designed wire sealing system, for sealing pool water from conduit pipe.

-
Product Details
About this product
Highlights
 Injection-molded of PVC for superior performance
 Non-corrosive durability
 OEM Hayward Part
Features
- Attractive, injection molded DuralonTM face rim assembly, for corrosion-free performance.
- Fast and simple installation. Minimal tools required.
- Specially designed wire sealing system, for sealing pool water from conduit pipe.
Brand Information

Hayward Industries, Inc. is the largest manufacturer of residential swimming pool equipment in the world. Headquartered in Elizabeth, New Jersey, Hayward designs and markets the Totally Hayward® System, a complete line of state-of-the-art, energy efficient residential pool equipment including pumps, filters, heaters, heat pumps, cleaners, electronic control systems, electronic chlorinators, lighting, safety equipment.
Visit Manufacturers Website -
Specifications

Installation Instructions:
1. If not pre-punched by the factory, drill & cut out the wall panel sections as per dimensions below:
a. CIRCULAR PANEL CUTOUT: 6” minimum to 6-1/8“ maximum diameter hole.
2. After unpacking the niche carton, remove the large lock ring on the backside of the housing assembly.
3. For non-lined pools only, install the flange gasket to the backside of the flange on the housing assembly by peeling off the paper exposing the adhesive, and pressing it firmly onto the flange.
4. If desired, caulk the backside of the housing flange (lined pool) or housing flange gasket (non-lined pool) with silicone or other suitable sealing compound.
5. Insert the housing assembly through the wall panel section from the interior of the pool.
6. Position the grounding bracket towards the TOP (12 O’clock). (Fig.1)
7. Install the large lock ring from the exterior of the pool, with the six (6) holes facing away from the pool wall (outward).
8. Snug the lock ring by hand while being careful to keep the word “TOP” on the outside of the housing towards the TOP (12 O’clock).
9. Insert the posts of the installation tool (Hayward P/N SP0608UT) into any two (2) adjacent holes on the lock ring. (Fig.2)
10. Insert a screwdriver (or similar tool) into either of the two (2) pry-bar slots. This will be used to prevent the housing assembly from rotating during final tightening. (Fig.2)
11. While firmly holding the screwdriver in the previous step, use a small rubber mallet to strike the tab of the installation tool, rotating the lock ring in the clockwise direction to tighten.
12. Install conduit fittings as needed. All Jiffy Niche TM niches are provided with two (2) UL Listed Conduit Fittings. A 1” trade size, 45° sweep elbow is provided for the purpose of directing the conduit pipe towards the SP0680/SP0681 Listed Junction Box location. A 1” x ¾” reducerbushing is provided to permit the use of ¾” conduit pipe. These conduit fittings must be cemented to the fixture housing (Niche), field supplied conduit pipe, and to other conduit fittings using approved PVC primer and cement. (Fig.3)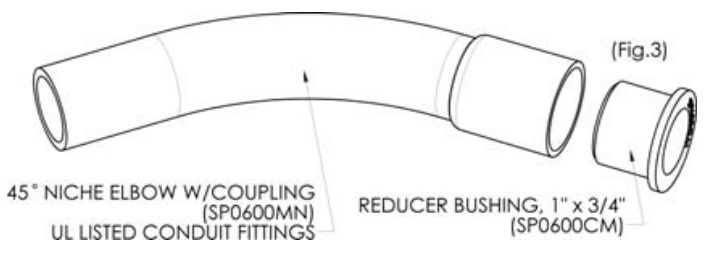
13. The Jiffy NicheTM housing is equipped with a combination bonding/grounding connector. The outside connection is the bonding connector as required by Article 680-22 of the NEC. Bond the Jiffy Niche TM to the pool structure. Using a solid copper conductor size #8 AWG or larger, connect the bonding connector to all of the metal parts of the swimming pool, spa, or hot tub; and to all electrical equipment, metal piping (except gas piping), and conduit within 5 ft. (1.5m) of the inside walls of the swimming pool, spa, or hot tub. Bonding connects all metal parts within and around the swimming pool, spa, or hot tub with a continuous wire. Bonding reduces the risk of a current passing between bonded metal objects, which could potentially cause electrical shock if grounded or shorted. Reference the NEC codes for all wiring standards including, but not limited to, grounding, bonding, and general wiring procedures.
14. The inside connection is the grounding connector as required by Article 680-20(b) of the NEC. The NEC requires that where a non-metallic conduit is used, a #8 AWG insulated copper conductor be installed in this conduit. Pull this conductor into the niche housing at least 6-8 inches.
15. Insert the ground conductor through the small hole in the cord seal. To do this, you must first pierce the small hole all the way through the cord seal with a small Philips screwdriver, or similar tool (Fig.4). From the conduit, the ground conductor must be fed through the cord seal from the small to the large end of the taper.
16. Connect the ground conductor to the niche grounding connector. The connector and wire termination must be encapsulated in 3M Inc. Scotch Cast Wet Niche Potting Compound No. 2135 (UL File E130394) or equivalent, to protect the connection from the possible deterioration effects of pool water.
17. For vinyl liner pools only. Before proceeding to the next step:
a. Backfill pool walls as needed.
b. Install the liner per the manufacturers instructions.
c. Smooth out any liner wrinkles on the front of the niche flange gasket.
18. Align the face ring assembly to the front of the housing assembly, with the word “TOP” on the front of the face ring towards the TOP (12 O’clock). For vinyl-lined pools, the housing assembly should be tightly covered by the liner, and not visible. DO NOT CUT THE LINER AT THIS POINT. Instead, align the face ring assembly to the protrusion in the liner formed from the niche housing.
19. Use a #2 Philips screwdriver to secure the face ring assembly tightly to the housing assembly with the six (6) #10 x 1" Philips flat head, type B tapping screws provided.
20. For vinyl liner pools, with a sharp blade, cut out the liner along the inside edge of the faceplate.
21. Install the light fixture per the light fixture instructions.Cord Sealing:
22. With the light fixture electrical cord, and all electrical wiring in place, slip the electrical cord through the slit, and into the large hole in the cord seal (Fig.4). From the conduit, the cord must enter the cord seal on the small end of the taper, and exit on the large end of the taper (Fig.5).
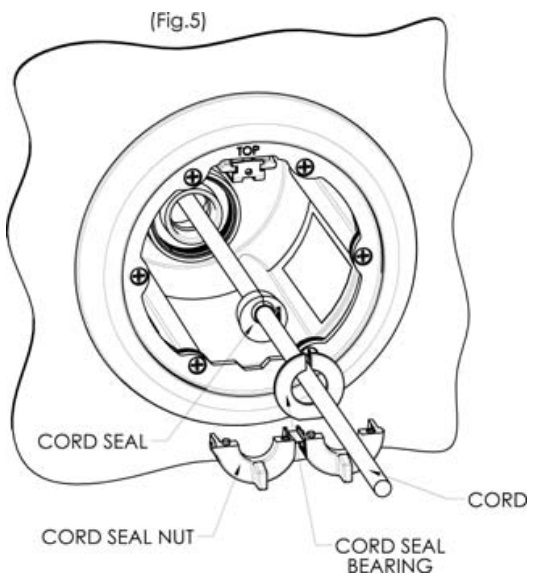
23. Holding the light fixture electrical cord (and grounding conductor if applicable) firmly in one hand, slide the cord seal toward the back of the niche housing, and into the tapered hole. Appropriate cord lubrication may be required to do this.
24. Slip the cord seal bearing over the light fixture electrical cord (and grounding conductor if applicable) by flexing it over the cord at the split.
25. Install the cord seal nut by folding and snapping it around the light fixture electrical cord (and grounding conductor if applicable).
26. Push the cord seal bearing into the cord seal nut until it snaps into place.
27. Slide the cord seal nut on the wires toward the back of the niche housing, and thread it into the niche housing threads.
28. Tighten snug (hand tight) as needed.
-
Q/A
No Questions
Log in
Create a Free Account
Please fill out sign-up form
Sign up with your social media account
Or
Fill out sign up form
Why create an account
Sign up with your social media account